Hello! Manuja and Flora are back! AKA FLOJA or MANURA :)
We began the second micro challenge with an idea of using a soil battery. We wanted to be able to use the micro-organisms (bacteria) in the soil to conduct electricity, which harnesses the natural electrochemical reactions occurring within the soil to produce electrical energy.
So the idea in simple words - the input is the soil battery, the processor is the intelligence of bacteria and artifical intelligence, and the output is a visual 3D printed model created from the data fluctuation of current and voltage within the micro-organisms in the soil battery.
Upon experimentation, we found out that there are multiple different variables that affect the conductivity of electricity in a soil battery. The composition of the soil, the moisture content, the temperature, the soil density and compaction and the electrode placement.
Our experimentation began with normal store bought soil with randomly added moisture to see the fluctuation in the conductivity of the soil. We realized that with more moisture, the soil is able to conduct electricity more efficiently.
The given objective to follow was to use intelligence as a processor to an input that provides a physical output. We began ideating with multiple different options that could potentially incorporate AI and microorganism intelligence, however we realized that we did not require to use two different intelligences. Our idea that we finalized on was to use the voltage, current and noise fluctuations of the soil battery to see how microorganisms inside soil communicate.
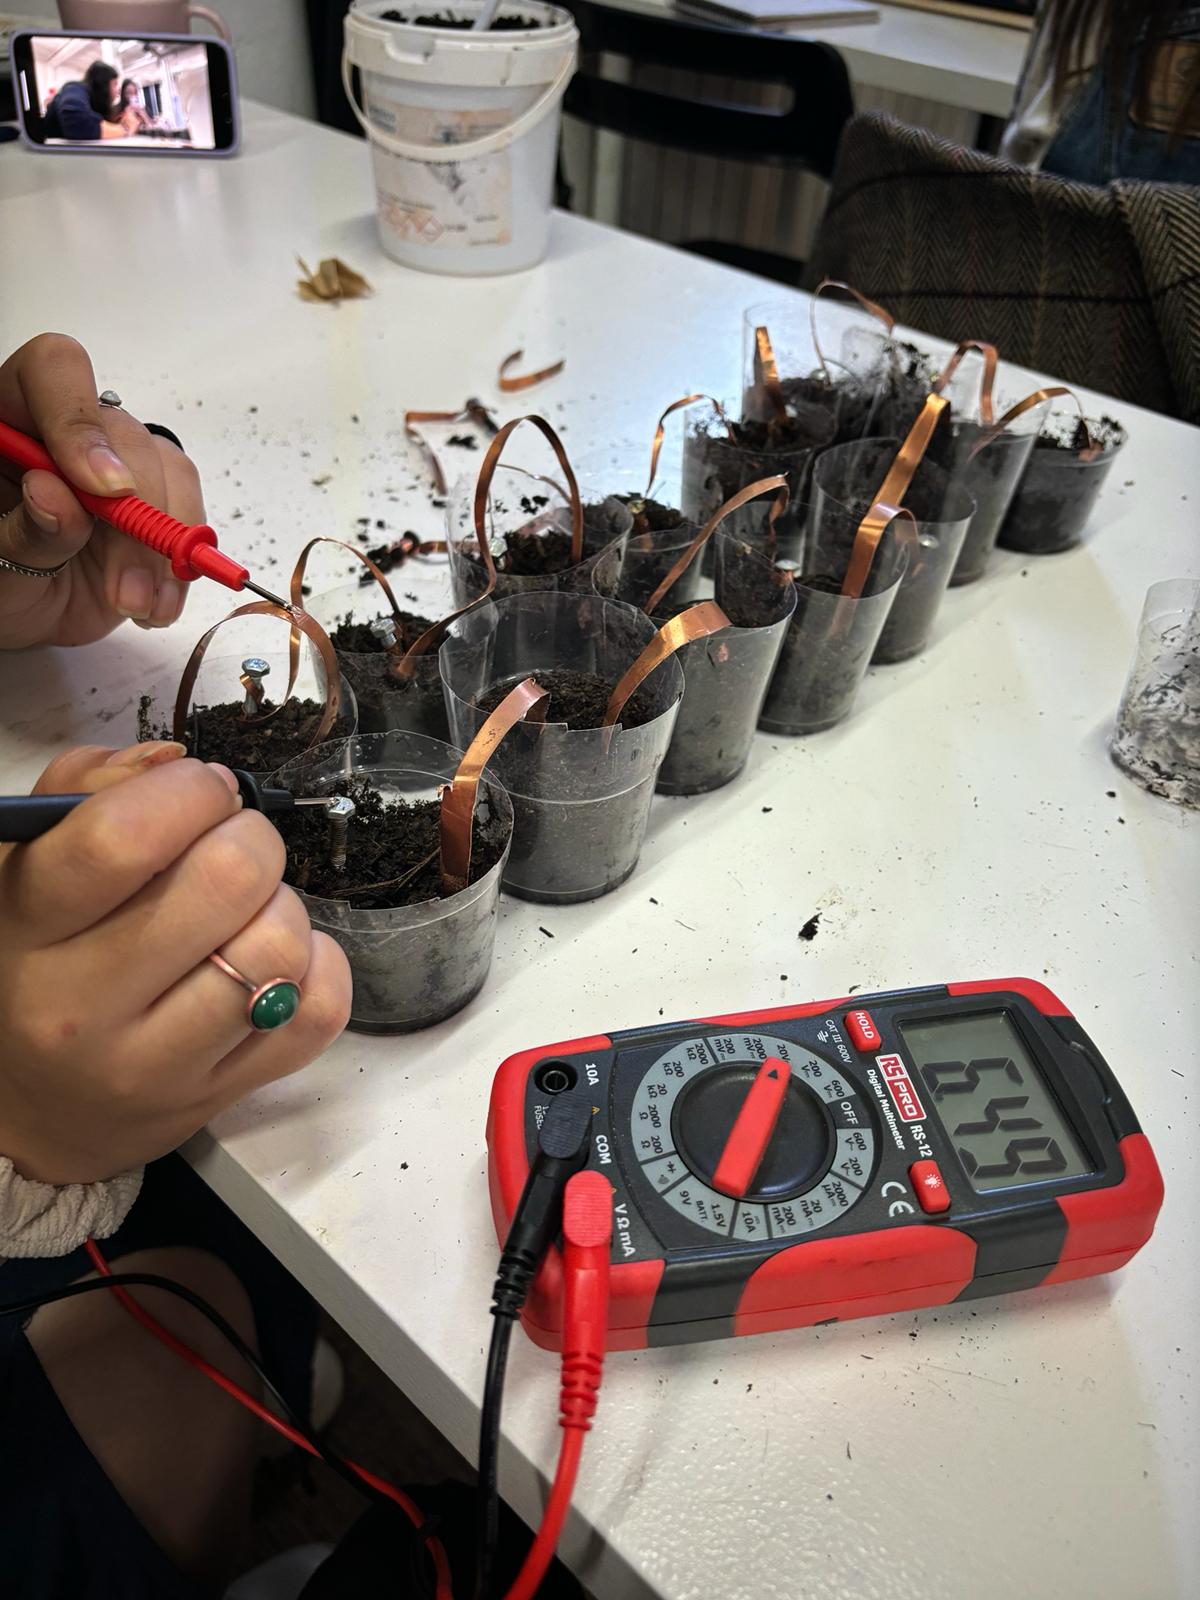
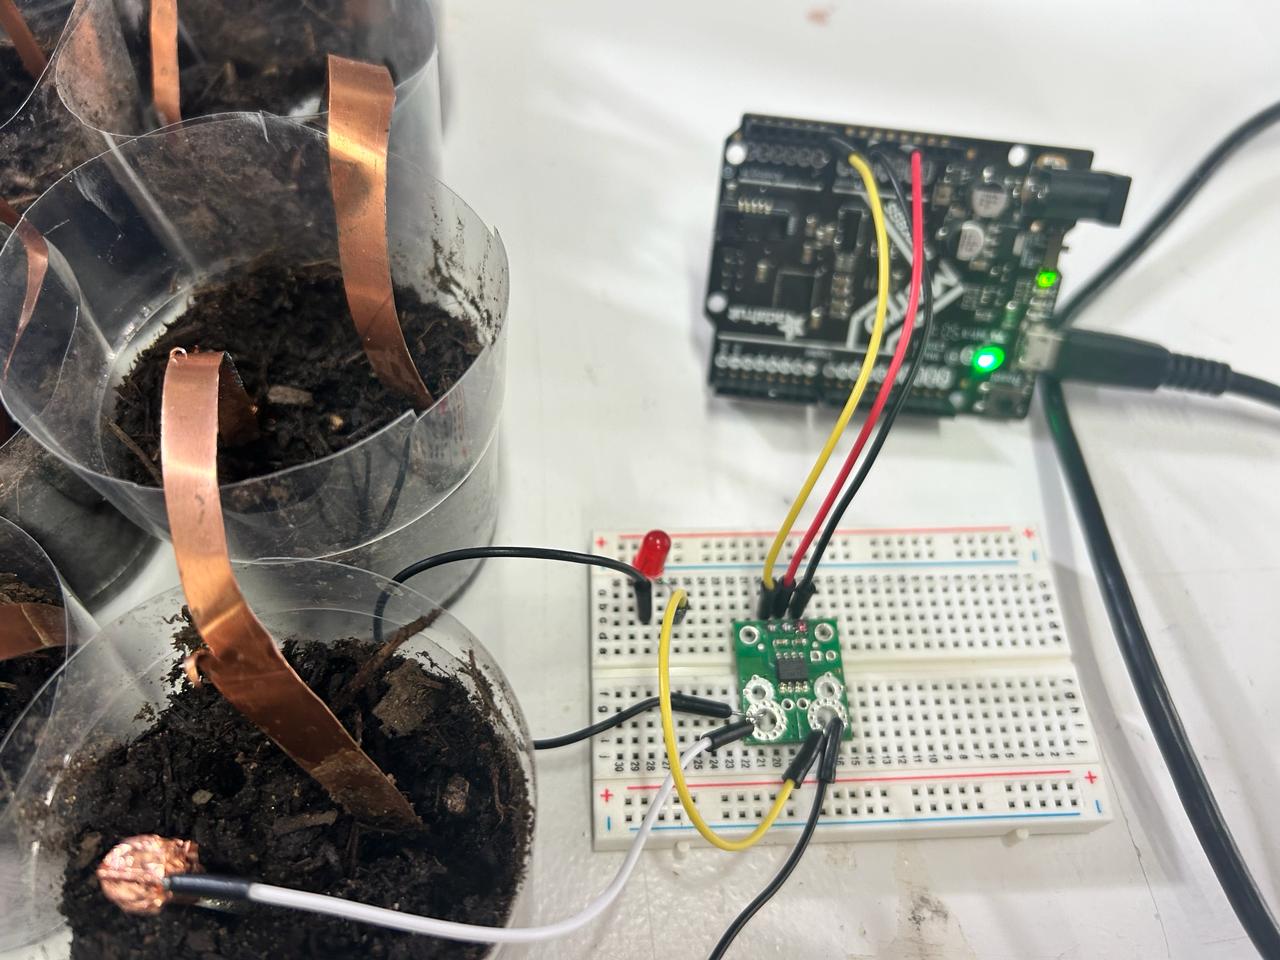
We connected 16 insulated cups of soil within each other in a series circuit with copper wires and nails, the copper wires were acting as the positive control while the nails were the negative control.
The highest voltage we were able to receive with the soil battery was approximately 12V and it was quite stable. However, with passing time and added fluctuation to the soil conductivity, we reached an unstable voltage of around 5V. We then used a current sensor carrier to add more information on the electricity passing through, that could change the variables in the x,y,z axis of the model to visually represent how microorganisms ‘communicate’ within each other.
We did this step by using chatgpt. We gave chatgpt prompts to generate a python code reading the values of the voltage, current and noise in blender. With the given python code, we put the code to blender to see how it was able to visually generate a model through the bacteria communication.
The prompts had to be very specific and required a lot of specificity, in order to generate a model that combines the different variables that we were receiving and the serial communication between Arduino.
How did we do it?
Create a soil battery. How to create a soil battery?
Materials Needed:
- Two different types of metal electrodes (such as zinc and copper)
- Soil (moist soil works best)
- Two wires with alligator clips
- Multimeter (optional, for measuring voltage,current)
- Container or pot to hold the soil !Get a material that has the properties of isolation so that each cell is well separated!
Steps:
- Prepare the electrodes: Clean the metal electrodes (e.g., zinc and copper) to remove any dirt or oxidation. You can use sandpaper or a wire brush for this purpose.
- Insert the electrodes into the soil: Insert the two metal electrodes into the soil, making sure they are at least a few inches apart and do not touch each other. The deeper they are inserted, the better contact they will have with the soil.
- Connect the wires: Attach one end of each wire to each metal electrode using the alligator clips.
- Measure voltage: If you have a voltmeter, you can connect it to the free ends of the wires to measure the voltage produced by the soil battery.
- Observe and experiment: Over time, the soil battery should generate a small voltage. You can observe the voltage readings and see how they change under different conditions, such as varying the types of soil, the distance between electrodes, or the types of metal used.
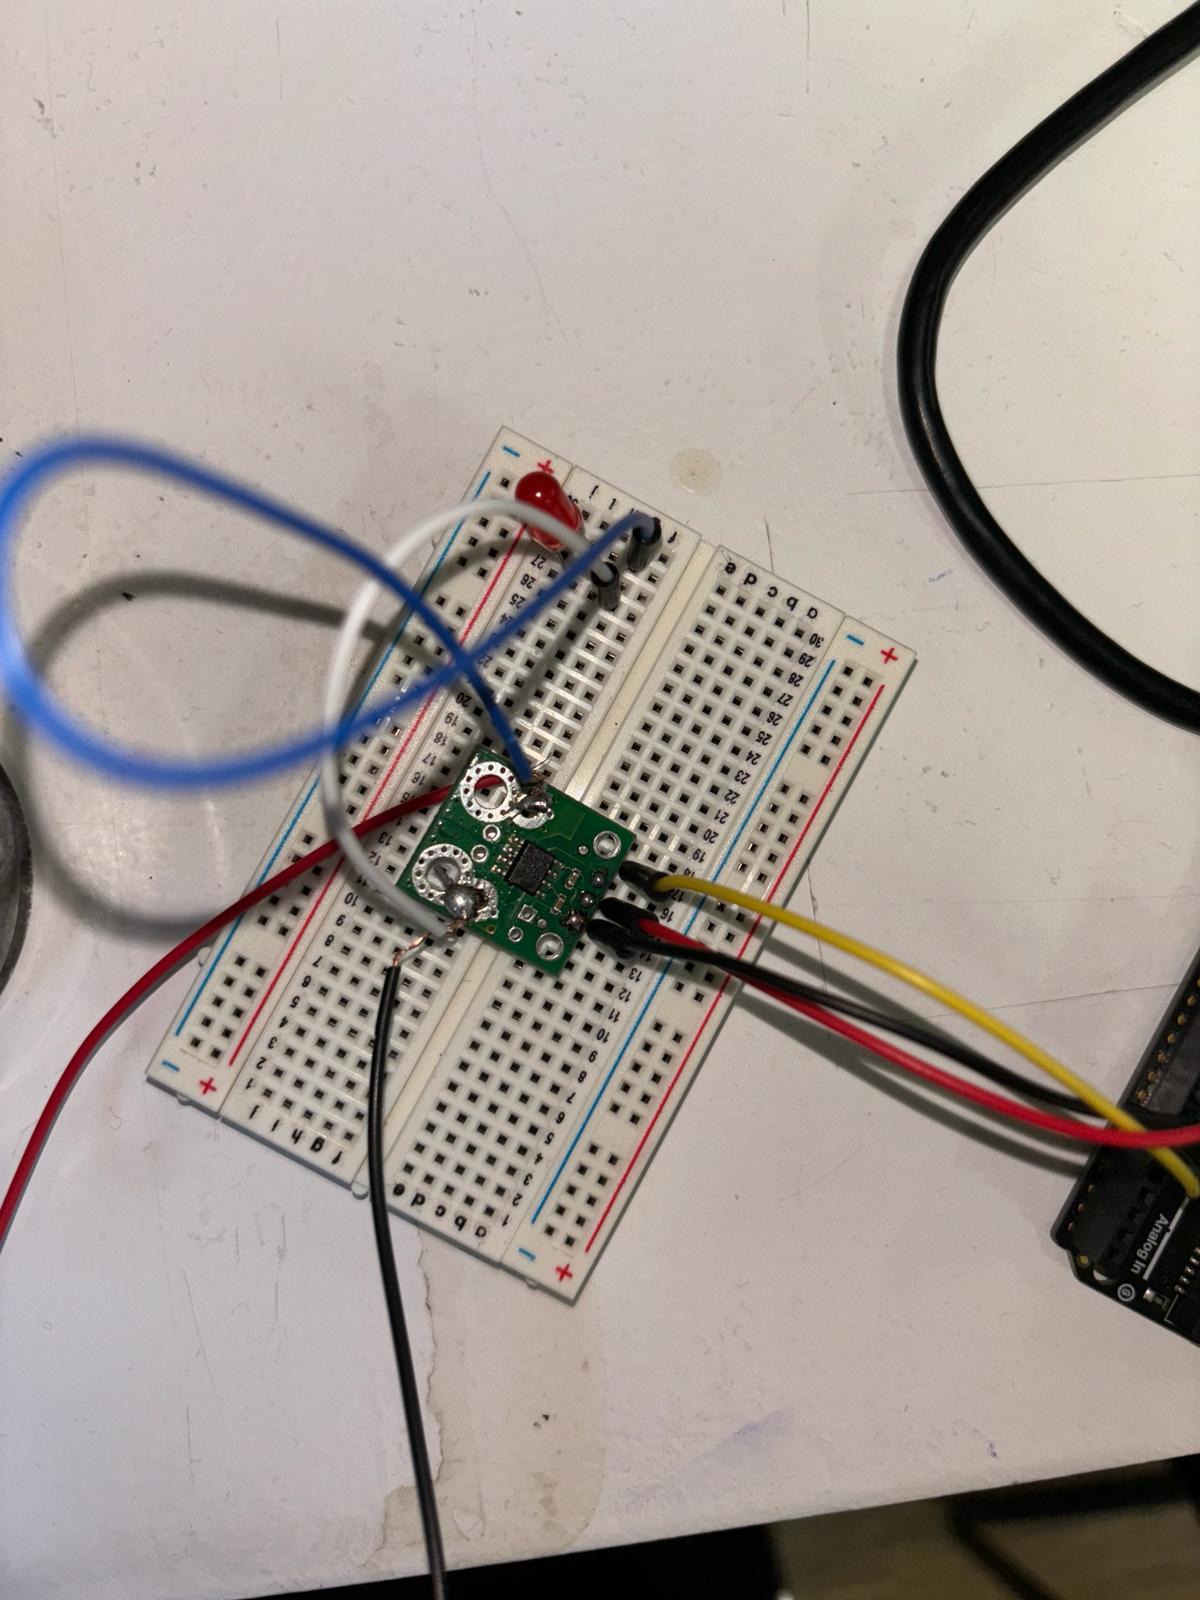
Connect the soil battery to the current carrier sensor.
Materials Needed:
- Soil battery setup (as described earlier)
- Current sensor carrier (e.g., ACS715)
- Breadboard
- Jumper wires
- Metro Express microcontroller (e.g., Adafruit Metro Express)
- USB cable for connecting Metro Express to a computer for programming
Steps:
- Prepare the Soil Battery: Set up your soil battery according to the steps outlined earlier. Ensure that you have the two metal electrodes inserted into the soil and connected to wires with alligator clips.
- Connect the Soil Battery to the Breadboard:
- Use jumper wires to connect the wires from the soil battery to the breadboard.
- One wire should be connected to the positive rail of the breadboard, and the other wire should be connected to the negative rail.
Code to read soil battery current with Arduino: code found on internet, lost the site but we will find it again
float V; // Voltage variable
float I; // Current variable
float Iav; // Current average variable
float noise; // Noise variable
int n; // Counter variable
int R; // Raw ADC reading variable
int Rav; // Raw Average ADC reading variable
const int analogInPin = A0; // Analog input pin connected to the ACS724 output
float voltageReference = 5.0; // Voltage reference for the Arduino (in volts)
//float sensitivity = 0.066; // Sensitivity of the ACS724 sensor (mV per A)
float sensitivity = 66;
void setup() {
Serial.begin(9600); // Initialize serial communication
}
void loop() {
for (n = 0; n < 10; n++) { // Do 10 times over
V = analogRead(analogInPin); // Read the voltage on the A0 pin
R = V; // Set R equal to the raw ADC value
delay(10);
V = (V / 1023.0) * 5000; // Convert the digital ADC value to millivolts (5V)
I = V / sensitivity; // Convert the sensor voltage reading to Amps
V = V/1000;
I = I;
Serial.print("V = ");
Serial.print(V);
Serial.print(" V\t"); // Print voltage
Serial.print("I = ");
Serial.print(I);
Serial.println(" mA"); // Print current
Iav = Iav + I; // Sum up the ten current measurements
Rav = Rav + R; // Sum up the ten digital ADC measurements
if (n == 9) { // If at the tenth measurement, take the average
Iav = Iav / 10; // Calculate the average current
Rav = Rav / 10; // Calculate the average digital ADC reading
// Calculate noise (standard deviation)
noise = 0;
for (int i = 0; i < 10; i++) {
V = analogRead(analogInPin);
R = V;
delay(10);
V = (V / 1023.0) * 5000;
I = V / sensitivity;
noise += pow(I - Iav, 2);
}
noise = sqrt(noise / 10);
Serial.print("Iav = ");
Serial.print(Iav); // Print out the average current value
Serial.print("\tNoise = ");
Serial.println(noise); // Print out the noise value
Iav = 0; // Reset the Iav value for the next run
Rav = 0; // Reset the Rav value for the next run
delay(2000);
}
}
}
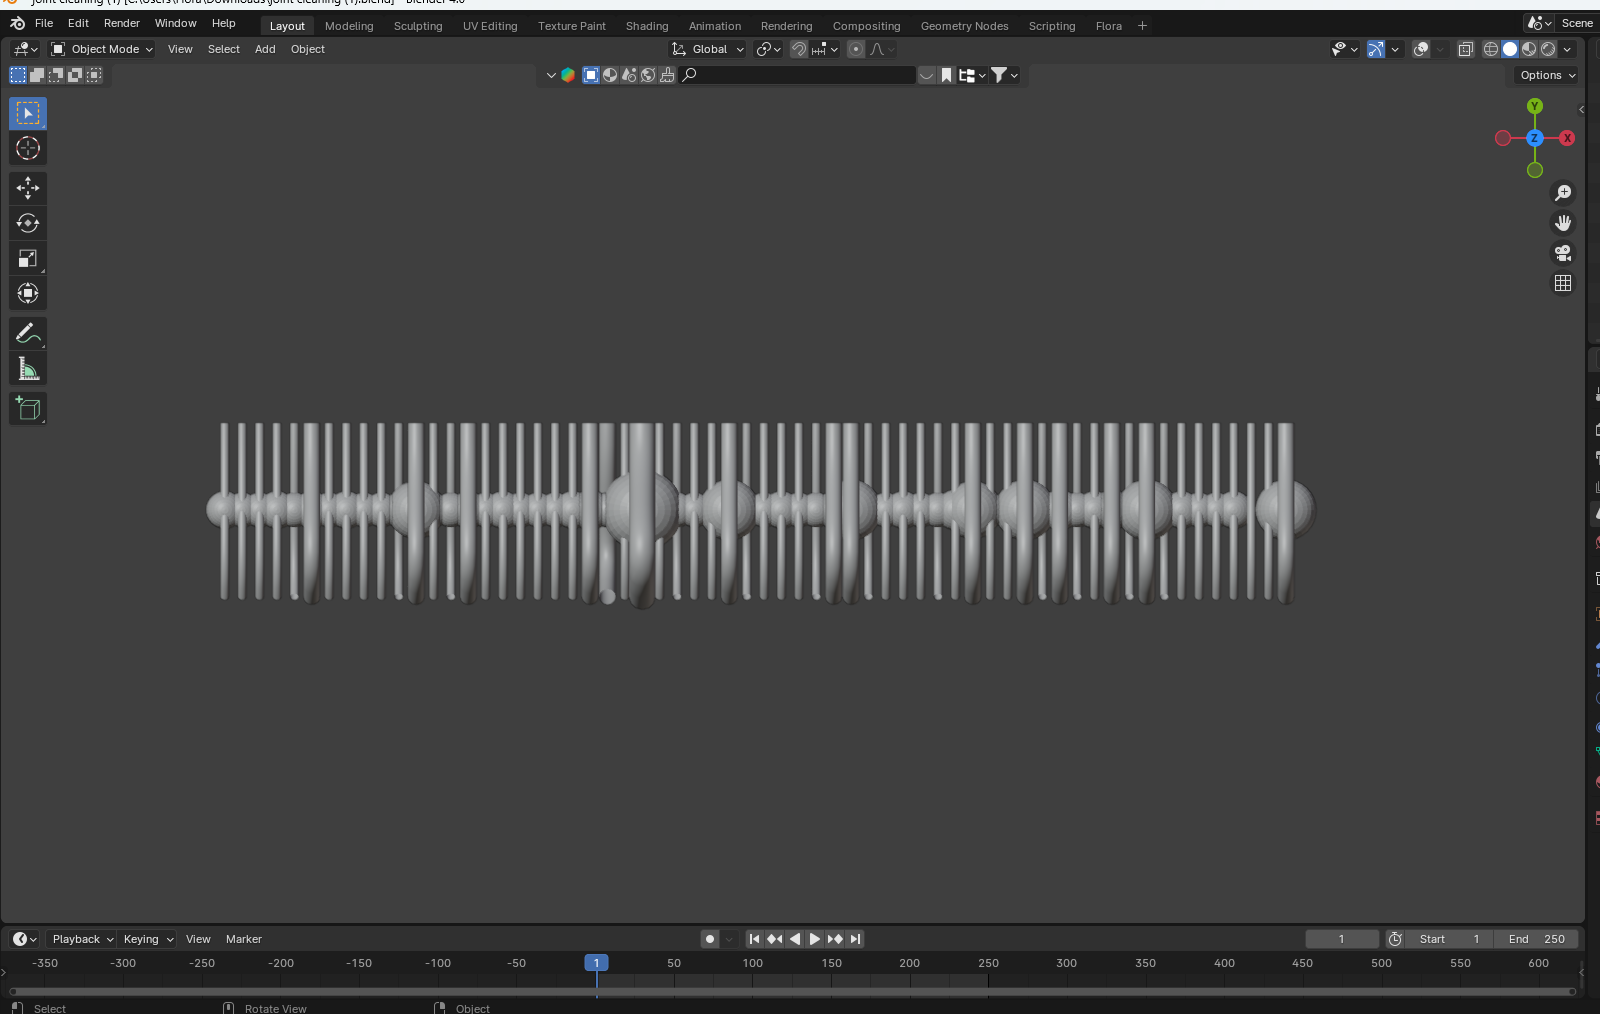
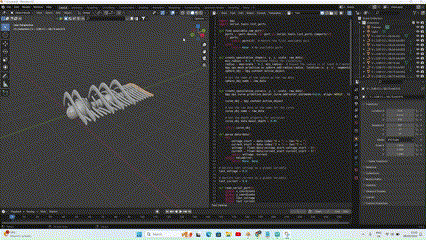
Python code generating curve and spheres every 2 sec depending on current and voltage coming in, in blender:
import bpy
import serial.tools.list_ports
def find_available_com_port():
ports = [port.device for port in serial.tools.list_ports.comports()]
if ports:
return ports[0] # Return the first available port
else:
return None # No available ports
def create_speculative_shape(x, y, z, scale, raw_data):
min_radius = 0.2 # Minimum radius for visibility
radius = max(scale * 0.1, min_radius) # Ensure the radius is at least 0.2 meters
bpy.ops.mesh.primitive_uv_sphere_add(radius=radius, location=(x, y, z), segments=32, ring_count=16)
sphere_obj = bpy.context.active_object
# Set the name of the sphere as the raw data
sphere_obj.name = raw_data
def create_speculative_curve(x, y, z, scale, raw_data):
bpy.ops.curve.primitive_bezier_curve_add(enter_editmode=False, align='WORLD', location=(x, y, z), scale=(1.0, scale, 1.0))
curve_obj = bpy.context.active_object
# Use the raw data as the name for the curve
curve_obj.name = raw_data
# Set the depth property for extrusion
curve_obj.data.bevel_depth = 0.05
return curve_obj
def parse_data(data):
try:
voltage_start = data.index("V = ") + len("V = ")
current_start = data.index("I = ") + len("I = ")
voltage = float(data[voltage_start:voltage_start + 5])
current = float(data[current_start:current_start + 6])
return voltage, current
except ValueError:
return None, None
# Declare last_voltage as a global variable
last_voltage = 0.0
# Declare last_current as a global variable
last_current = 0.0
def read_serial_port():
global x_coordinate
global y_coordinate
global last_voltage
global last_current
'''
global x_coordinate_sphere
global y_coordinate_sphere
global last_current
'''
data = ser.readline().decode().strip()
print(f"Raw Data: {data}")
voltage, current = parse_data(data)
print(voltage)
print(current)
if voltage is not None and current is not None:
print(f"Voltage: {voltage} V, Current: {current} mA")
# Calculate scaling factor based on voltage change
scaling_factor = 1.0 + (voltage - last_voltage) / 0.01 * 2
diff = current - last_current
scaling_factor_sphere = 1.0 + (diff) / 0.01 * 1/3
#print(diff)
#print(scaling_factor_sphere)
scaling_factor_sphere = scaling_factor_sphere/2 + 0.5
print(scaling_factor_sphere)
# Use the scaled current as the scale for the sphere
sphere_obj = create_speculative_shape(x_coordinate, y_coordinate, 0, scale=scaling_factor_sphere, raw_data=data)
# Use the scaled voltage as the scale for the curve
curve_obj = create_speculative_curve(x_coordinate, y_coordinate, 0, scale=scaling_factor, raw_data=data)
# Update the curve's y-axis scale based on voltage change
curve_obj.scale.y = scaling_factor
#sphere_obj.scale = (scaling_factor_sphere,scaling_factor_sphere,scaling_factor_sphere)
# Update last_voltage for the next iteration
last_voltage = voltage
# Update last_current for the next iteration
last_current = current
# Increment y_coordinate by 0.05 for the next curve along the y-axis
# Displacement distance of both objects.
y_coordinate += 0.2
# Rotate the curve to face the sky
curve_obj.rotation_euler = (0, 0, 0) # Reset rotation
curve_obj.rotation_euler.rotate_axis("X", 1.5708) # 1.5708 radians is approximately 90 degrees around X-axis
return 2.0
com_port = find_available_com_port()
if com_port:
print(f"Connecting to {com_port}")
ser = serial.Serial(com_port, 9600, timeout=1)
x_coordinate = 0.0
y_coordinate = 0.0
bpy.app.timers.register(read_serial_port)
else:
print("No available COM ports found.")
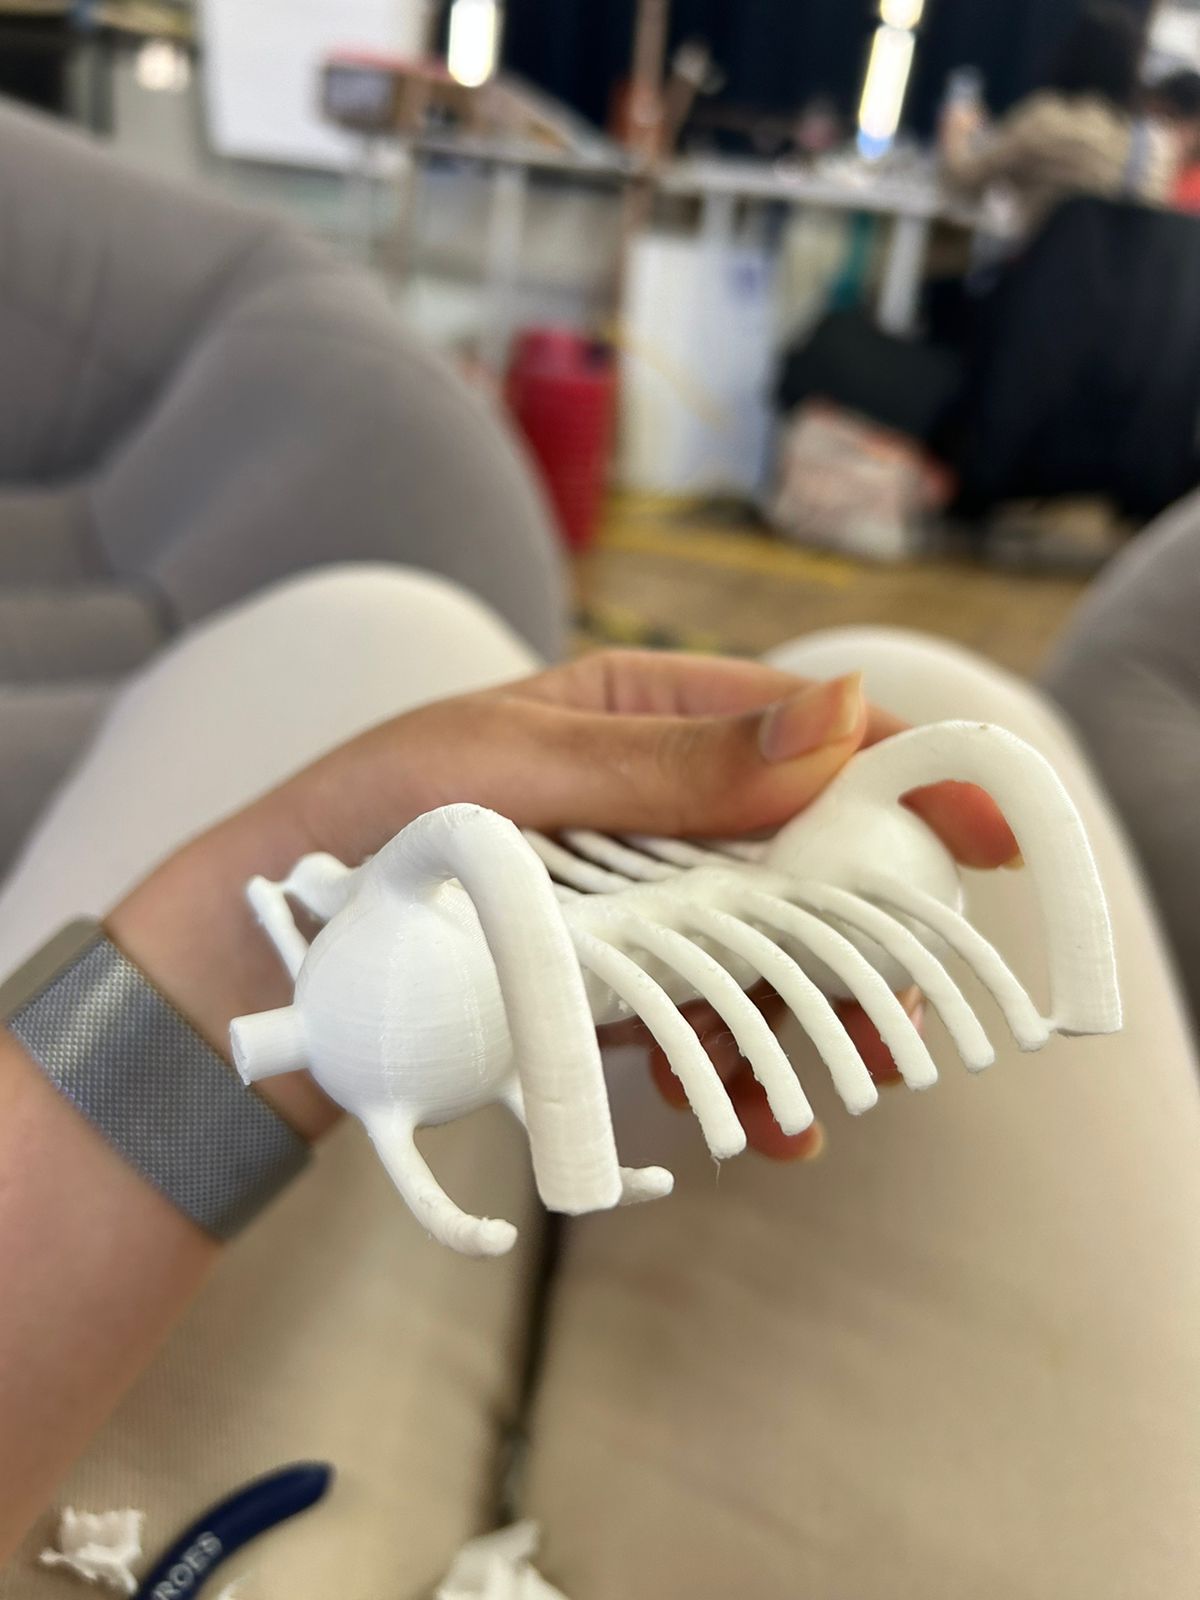
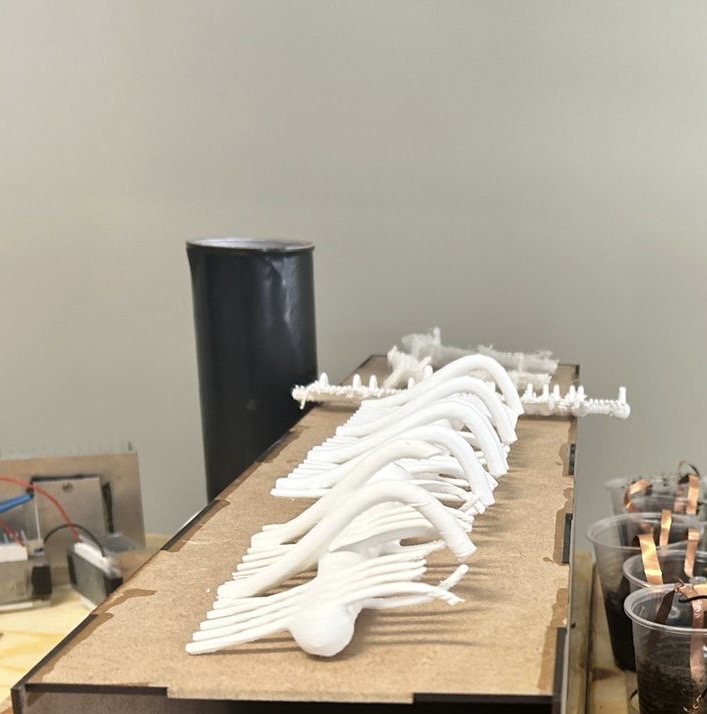
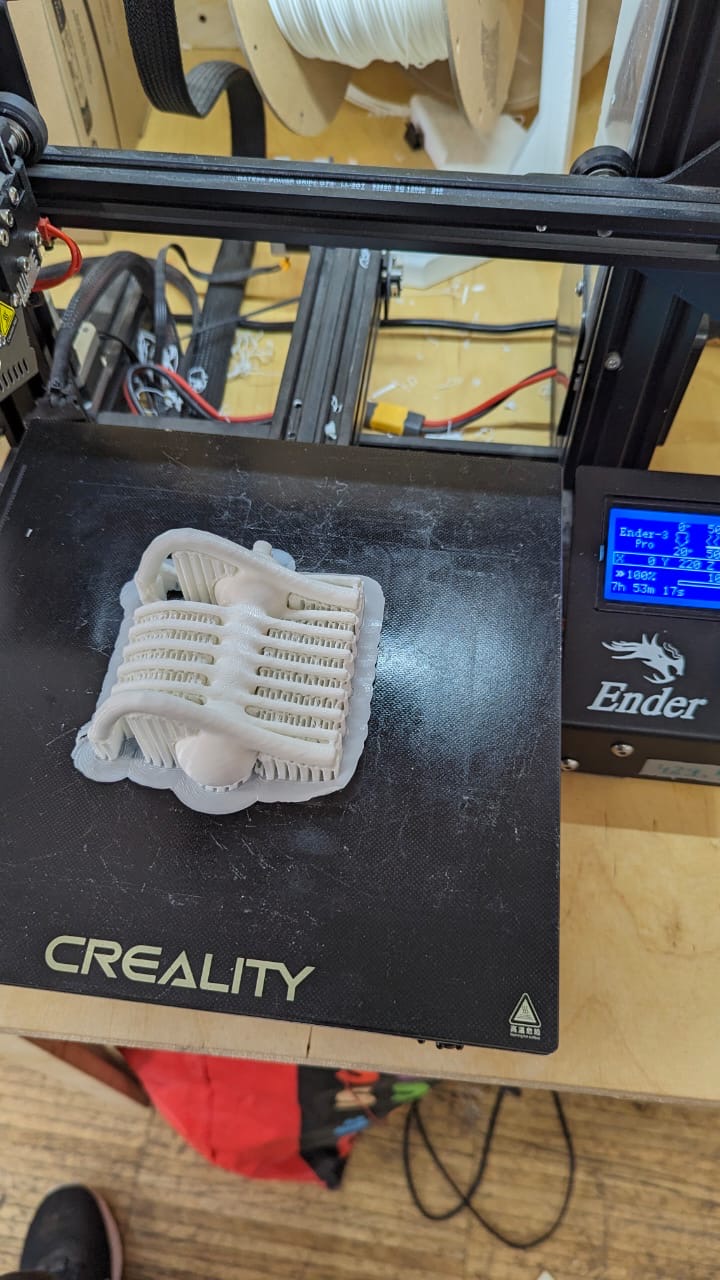
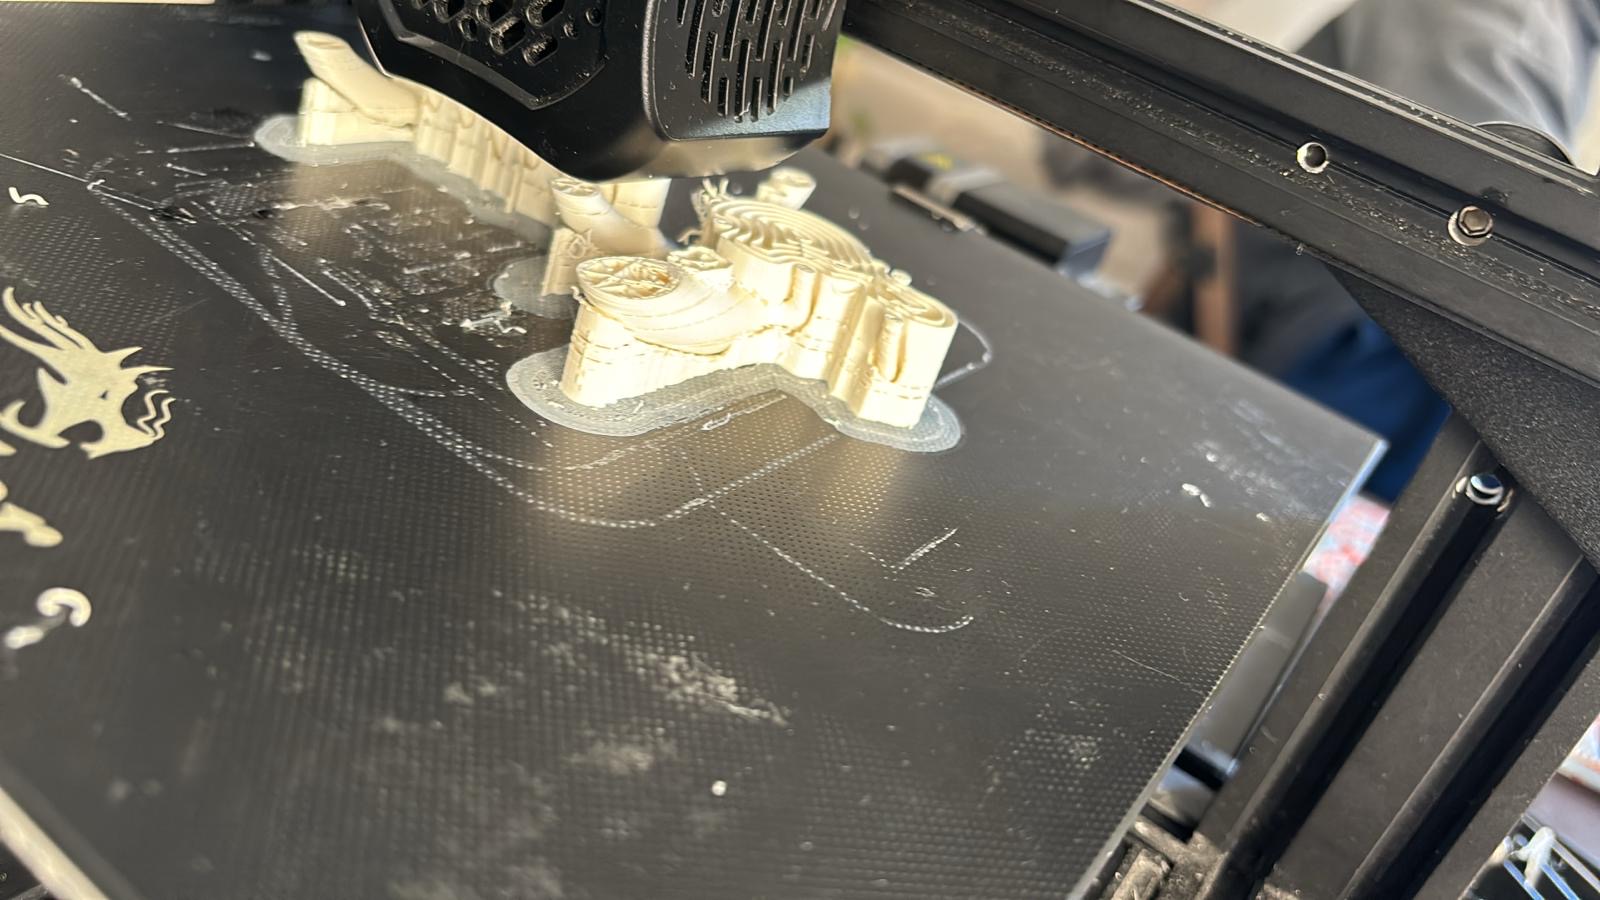
Experimentation of a physical output of the current reading, done through 3Dprinting
Reflection
Following our last micro-challenge, I was eager to explore further into low-power energy sources. We started prototyping a low-power soil battery, inspired by my interest with living bioenergy and Manuja's interest in low-power energy. Within this reflection, I aim to address several key points: rapidly learning to use sensors within the micro-challenge context, comprehending the data received from these sensors, reflecting on the transformation of prompts from GPT into code for Blender, how this challenge has influenced my perspective for future research, and understanding the utility of low-power devices.
Given my limited knowledge of electronics, it was super helpful to have access to a current sensor reader. It enabled us to dive deeper into understanding how to read and measure current in low-power devices. Through this, I gained insights into current variations and speculated on the necessary components to stabilise it. Generating data from the sensor provided us with material to interpret the information. While I'm not used to working with data representation, this exercise was beneficial and motivated my interest in further exploring the concept of rendering living intelligence physically.
Learning how to prompt with ChatGPT and transform these prompts into code was also super interesting. As I'm not knowledgeable in coding within Blender, this hands-on approach served as a valuable learning experience in interacting with the GPT platform and Blender, while also encouraging speculation on future technologies like prompt-to-3D-model add-ons in Blender.
Looking ahead, I'd like to continue my investigation into soil microbial fuel cells to deepen my understanding of the relationship between soil bacteria colonies and the technology utilised for energy harvesting. I aim to explore ways to benefit both the bacteria and soil using low-power devices, whether through sensors, processes that support organic growth, or nutrient provision for the colony. Additionally, I'm researching the most passive materials to introduce into the soil, considering that materials like copper and metal rust may interfere with energy generation from bacterial activity. Based on research, graphite appears to be a potential electrode material, as it isn't a metal and can also enrich the soil with minerals. While there's limited research on charcoal, I'm intrigued by its potential as an option.
At the beginning of this research, I felt somewhat constrained by the low power generated by the soil battery. However, I'm gradually realising that many technologies don't require high volts or currents. While I may not currently be able to power an Arduino with electrical current, there are still numerous opportunities to work with sensors, low-power circuits, LED, motors, mechanical power, air pumps, and more. Fun!

Best AI Website Maker